Glucometer OneTouch Ultra Plus Flex
Glucometer OneTouch Ultra Plus FlexOneTouch Ultra Plus Flex glucometer with color-coded technology for easy interpretation of scan results. The boundaries of the color ranges can be adjusted individually according to the doctor's recommendations. Recommended for use with OneTouch Ultra Plus Test Strips.
Service support
Our goal is to provide you with quality medical products.
If you have any questions about OneTouch® products, please contact the LifeScan Advisory Line at 0 800 500 353 (free within Ukraine).
Indications for use (instruction): Glucometer OneTouch Ultra Plus Flex
OneTouch Ultra Plus Flex™ is a blood glucose meter with new color prompting technology. Each blood glucose result is displayed on the meter screen along with a range indicator arrow. The arrow points to the color scale and you can immediately see if the result is within the target values, above the range or below it. If the obtained measurement result is "within the range" - the arrow of the range indicator will point to green, "below the range" – to blue, "above the range" – to red.
Target range limits are already preset (according to International Standards). However, you can always change the limits of the ranges individually for you, in accordance with the doctor's recommendations – determine your acceptable range of blood glucose values and simply set new ranges on the meter. When tested with the OneTouch Ultra Plus Flex™ meter, you get results with high accuracy; it is proven by Clinical studies and fully complies with the requirements of the latest International Accuracy Standard ISO 15197:2013.
OneTouch Ultra Plus Flex™ Meter Features
- The analysis method is electrochemistry. Measuring range: 1.1-33.3 mmol/L
- Plasma calibration
- Completely missing coding
- The Test Strip OneTouch Ultra Plus® Protected Capillary – draws blood by itself into the capillary from the side of the strip. The enzyme of the test strips – FAD-GDH (glucose dehydrogenase flavin adenine dinucleotide dependent) – is specific to glucose, excludes the influence of oxygen during the test. Palladium and gold electrode surfaces ensure reliable conductivity during testing.
- Test time: 5 seconds
- Memory – 500 results with date and time of analysis
- A tiny drop of blood is only 0.4 μL, which means a minimum puncture depth is required. The shallower the depth, the less pain when testing.
- The hematocrit level is 20-60%.
- Application temperature 6 °С – 44 °С, relative humidity 10% – 90%.
- Accuracy*: 99.2%. For glycemic levels less than 5.5 mmol/L – 100%
- Power supply – one replaceable lithium battery CR 2032 (3.0 V)
Appointment
The OneTouch Ultra Plus Flex ™ Blood Glucose Monitoring System is designed to quantify glucose (sugar) in fresh capillary whole blood samples from a fingertip. The system is intended for use by one patient only and should not be given to other people for use.
The OneTouch Ultra Plus Flex ™ Blood Glucose Monitoring System is designed for self-monitoring and operates outside the body (designed for in vitro diagnostics). It can be used at home by people with diabetes mellitus and by medical professionals to examine patients in a clinic setting - as a tool to monitor the effectiveness of diabetes control.
The OneTouch Ultra Plus Flex ™ Blood Glucose Monitoring System should not be used to diagnose or screen diabetes, or to measure blood glucose in newborns.
How to use
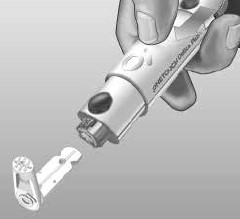
Preparation of piercing handles
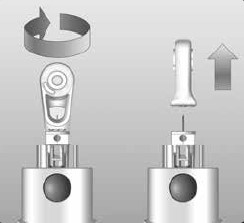
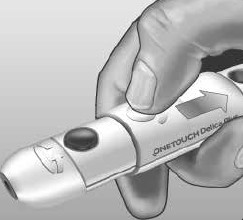
1. Remove the cap from the puncture knob.
To do this, you need to return the cap and pull it from the product.
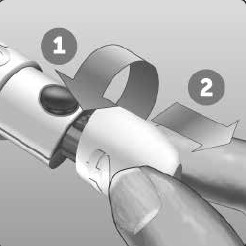
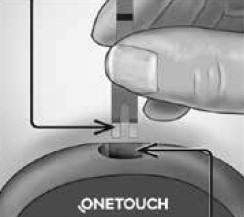
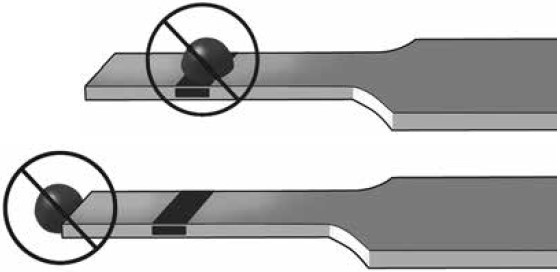
2. Insert the sterile lanceset into the puncture handle.
Keep lancet, as shown in the figure, so that he entered the lancet holder. Insert the lanceset into the puncture knob until it clicks to enter the Lancet holder and completely became in place.
Turn the lancet protective cap to one full revolution until it is separated from Lancet. Save the protective cap to extract and dispose of lancet.
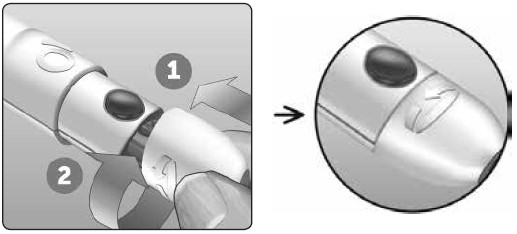
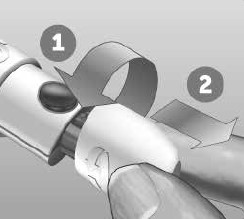
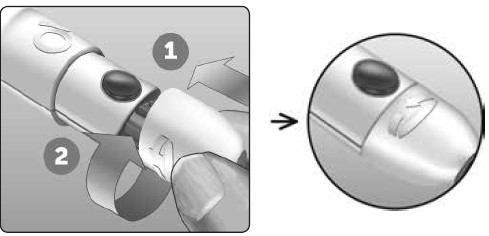
3. Put the pad knobs for piercing.
Return the cap on its place on the piercing handle, after which wrap the cap on one turn or click on the cap to secure it.
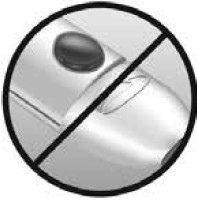
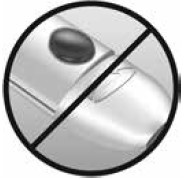
Make sure the cap is located exactly as shown in the figure.
4. Perform the prolque depth settings.
In the product settings, 13 puncture depth variants are provided (each point between the numbers 1 and 7 on the depth adjustment wheel corresponds to another variant of the depth of the puncture). Select the depth of the puncture by turning the wheel. Large digits correspond to a greater depth of puncture and vice versa.
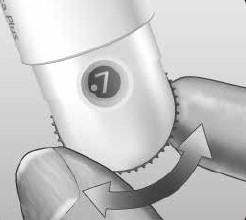
NOTE. First try to make a shallow puncture, and then increase the depth until it becomes enough to get a blood sample of the desired volume.
5. Two piercing handle.
Take off the erection mechanism until it clicks. If he does not click, he could already be reduced when you inserted Lancet.
Preparation of glucometer
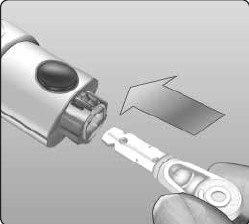
1. Insert the test strip to turn on the glucometer.
Insert the test strip in the place to enter the test strip in the blue side and two silver teeth.
NOTE. This glucometer does not require encoding. A flashing icon in the form of a drop of blood appears on the screen. Now you can apply a blood sample on the test strip.

Obtaining a blood sample from a finger tip
Each time a test, choose a puncture place. Repeated punctures in the same place can cause pain or corns.
Before testing, thoroughly wash the hands and the place of taking the sample with warm water with soap. Sight and thoroughly dry your hands. The presence on the skin of any contaminants may affect the analysis result.
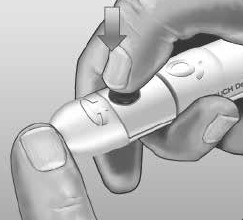
1. Plug the fingertips.
Press the pen tightly to the side surface of the fingertip. Press the descent button. Take the pen for piercing the finger.
2. Get a round drop of blood.
Carefully squeeze and/or slightly massage the fingertips until a round drop will appear.
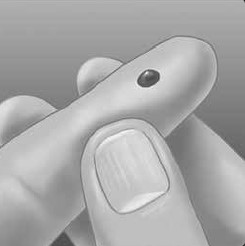
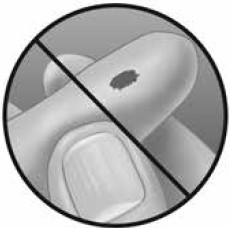
NOTE. If the blood is smeared or drops, do not use this sample. Wipe the puncture zone with a dry napkin and carefully squeeze the other drop of blood, or make a puncture elsewhere.
Blood applying for a test strip
1. Apply the sample on the test strip.
Blood can be applied on any side of the test strip.
Apply the test strip to a drop of blood to any side of the capillary.
Be sure to apply the sample immediately after receiving the blood drop.
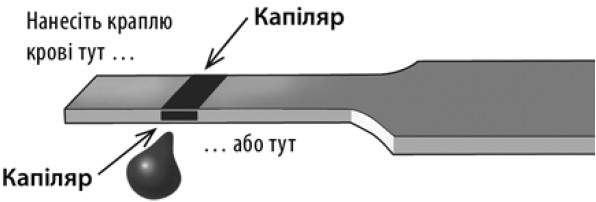
Holding a glucometer under a small angle, lay the capillary hole to a drop of blood.
When the capillary on the test strip will affect blood drops, the test strip spots blood into the capillary.
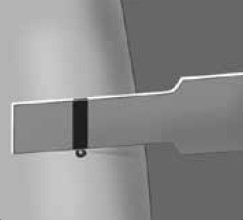
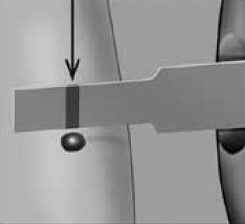
2. Wait until the test strip capillary fully fills.
A drop of blood will be drawn into a narrow canal. At the same time, the capillary must be filled completely.
The capillary will become red, and the glucometer will start counting from 5 to 1. Do not apply the blood to the upper surface of the test strip or its top edge.
Obtaining measurement results
Your result will appear on the glucometer screen along with measurement units, date and test time. When the result is the result of determining the level of glucose, the arrow of the band indicator indicates where the result is also displayed on it, which indicates where the result is: below, above or within the proper range. The arrow indicates the corresponding part of the color scale of the band on the glucometer.
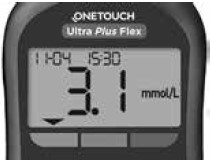
Example. The result is below the range.
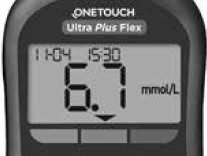
Example. Result within range.
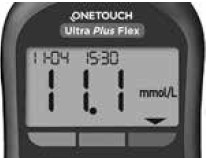
Example. The result is above the range.
Interpretation of unexpected results
If the test results are higher or lower than you expected, taking into account the following notes.
Low results
If the result is below 3.9 mmol/l or a LO warning is displayed (this means that the result is less than 1.1 mmol/l), this may indicate the presence of hypoglycemia (low blood glucose level). This provision requires immediate treatment in accordance with the recommendations of your medical specialist. Although such a result may be a consequence of the test error, it will be safer to first take therapeutic measures, and then take another testing.
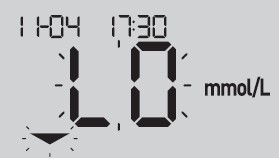
NOTE. If the result of determining the level of glucose is less than 1.1 mmol/l, the LO warnings and the band indicator arrow will flash on the glucumber screen.
Dehydration (dehydration) and low result values
You may get lower results if you are severely dehydrated (severely dehydrated). If you think you have severe dehydration (severe dehydration), see your healthcare professional right away.
High results
If the test result is higher than 10.0 mmol/l, it may indicate hyperglycemia (high blood glucose) and you should retest. See a healthcare professional if you are concerned about the possibility of developing hyperglycemia.
The HI message is displayed on the meter screen when the measurement result is higher than 33.3 mmol/l. You may have severe hyperglycemia (critically high blood glucose).
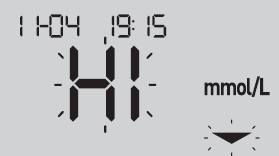
Retest your blood glucose. If you get the HI alert again as a result, it means there is a serious problem with your blood glucose control. See a healthcare professional immediately and follow their recommendations.
NOTE. If your glucose result is greater than 33.3 mmol/l, the HI warning and the range indicator arrow will flash on the meter screen at the same time.
Repeated unexpected results
- If you get unexpected results multiple times in a row, use a control solution to test the product.
- If your symptoms do not match the measured results, although you have followed all instructions in the User's Manual, contact your healthcare professional. Never ignore symptoms or make significant changes to your diabetes control program without consulting a healthcare professional.
Increased or decreased red blood cell count
Very high (more than 60%) or very low (less than 20%) hematocrit (percentage (%) of red blood cells in the blood) can lead to false results.
Removal of used lancet
NOTE. The lancing device has a lancet eject function, so you don't have to pull out the used lancet by hand.
1. Remove the lancing device cap from the lancing device.
To do this, you need to return the cap and remove it from the product.
2. Place the protective cap on the tip of the lancet.
Before removing the lancet, place the protective cap on a hard surface, then press the tip of the lancet into the flat side of the cap.
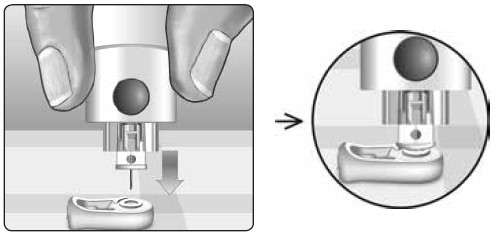
3. Push the lancet out of the lancing device.
With the lancing device pointing downward, slide the convergence mechanism forward until the lancet comes out of the lancing device. If the lancet cannot be pushed out, close the handle again and then slide the convergence mechanism forward until the lancet comes out.
4. Replace the lancing device cap.
Return the cap to its place on the lancing device, then wrap or press on the cap to secure it securely.
Make sure the cap is positioned exactly as shown in the illustration.
It is important to use a new lancet every time you take a blood sample. Do not leave the lancet in the lancing device. This will help prevent infection and damage to your fingertips.
Disposal of the used ancet and test strip
Dispose of the used lancet carefully after each test to avoid accidental puncturing with the lancet.
Used lancets and test strips may be considered biohazardous waste in your area. Follow your healthcare professional's advice and local regulations for proper disposal of these items.
Wash your hands thoroughly with soap and water after using the meter, test strips, lancing device, and cap.
Rules for using the glucometer
- Use only OneTouch Ultra® Plus Test Strips.
- Unlike other meters, the OneTouch Ultra Plus Flex™ system does not require separate coding to operate.
- Testing should be performed over an operating temperature range of 6°C to 44°C and a relative humidity of 10% to 90%.
- Make sure the meter and test strips are at approximately the same temperature before testing.
- Store test strips in a cool, dry place between 5°C and 30°C and up to 65% relative humidity.
- Do not test if there is condensation (water droplets) on the meter. Move your meter and test strips to a cool, dry place and wait until the surface of the meter is dry before testing.
- Do not open the test strip vial until you are ready to remove the test strip and test. Use the test strip immediately after you receive it from the vial.
- Close the test strip vial tightly immediately after use to prevent contamination and damage to the test strips.
- Store unused test strips only in their original vial.
- Do not put a used test strip in the vial after testing.
- Do not use a test strip that has been coated with blood, control solution, or any contaminants. Test strips are for single use only.
- With clean, dry hands, you can touch anywhere on the surface of the test strip. Do not bend, cut, or deform the test strip.
- After you open the test strip vial for the first time, record the disposal date on the label. Refer to the test strip instructions for use or on the vial label for recycling date instructions.
It is not recommended to compare blood glucose results obtained with this meter with those obtained with another meter. Results from different meters may vary and comparison is not a reliable way to determine whether your meter is working properly. To verify the accuracy of your meter, you must periodically compare your results with those obtained in the laboratory.
IMPORTANT. If another person helps you test, the meter should always be cleaned and disinfected before that person can use it.
The OneTouch Ultra Plus Flex™ Blood Glucose Monitoring System should not be used by patients who have had a D-Xylose uptake test within the previous 24 hours, as this may cause excessive results.
Do not use the OneTouch Ultra® Plus Series meters if it is known or suspected that PAM (Pralidoxime) will be available in the patient's whole blood sample.
Do not use test strips if the vial is damaged or left open. This can lead to error messages or inaccurate results. Contact Customer Service immediately if the test strip vial is damaged. LifeScan advisory line: 0 800 500 353 (free from a landline phone), Mon-Fri, 09: 00-18: 00.
If you are unable to do the test due to a problem with any component of the testing system, contact your healthcare professional. Remember that a timely analysis will help prescribe the right treatment and avoid serious medical conditions.
The test strip vial contains a desiccant that is harmful if inhaled or swallowed and may irritate the skin or eyes.
Do not use test strips after the expiration date (printed on the vial label) or after the disposal date, whichever comes first; otherwise, test results may be inaccurate.
Release form
- OneTouch Ultra Plus Flex™ blood glucose meter with battery.
- OneTouch Ultra Plus® Test Strips 10 pcs.
- Piercing handle.
- Sterile lancets 10 pcs.
- User manual in Ukrainian.
- Compact protective case.
Storage conditions
KEEP the meter and test strip vial in the case in a cool dry place at temperatures between 5°C and 30°C and up to 65% relative humidity, out of the reach of children. DO NOT store in the refrigerator, away from direct sunlight and high temperatures.
Manufacturer
Flextronics Industrial (Shenzhen) Co., Ltd (Flextronix Industrial (Shenzhen) Co., Ltd for LifeScan Europe, a division of Cilag GmbH International (LifeScan Europe, a division of Cilag GmbH International), Zug, Switzerland.
Service support
Our goal is to provide you with quality medical products.
If you have any questions about OneTouch® products, please contact the LifeScan Advisory Line at 0 800 500 353 (free within Ukraine).
WARRANTY - we provide unlimited free service support for the entire period of use of your OneTouch meter.
Sanitary and hygienic conclusion
No. UA.MD.354-21 dated 04/27/2021
F.A.Q.
1. The meter shows an error message. What to do?
If you are having problems with your OneTouch® meter, read the user manual and look for solutions there. If the problem cannot be solved, contact the LifeScan Advisory Line by phone: 0 800 500 353 (call within Ukraine is free). When you call, first have your meter and test strips ready so you have them close at hand.
2. Can the OneTouch Ultra Plus Flex meter readings be compared with others?
We do not recommend comparing test results from different devices. Different meters may show different results, but this does not allow you to verify that your meter is reading correctly.
3. Are all test strips compatible with the OneTouch Ultra Plus Flex Glucometer?
No, OneTouch Ultra Plus test strips are compatible with the OneTouch Ultra Plus Flex glucometer.
4. Where can I get the meter control solution?
OneTouch® Control Solutions are sold separately and are not included with your meter. To find out if control solution is available, call the LifeScan Advisory Line at 0 800 500 353, or contact your convenience store pharmacist or healthcare professional.
5. Does the OneTouch Ultra Plus Flex glucometer require coding?
No, you do not need coding to measure blood sugar on your OneTouch Ultra Plus Flex glucometer.

This section of the site contains information about medicines, their properties, methods of use, as well as other specialized information that is intended for healthcare professionals. The information on medicines contained in this section is not a guide for self-diagnosis and / or treatment. LLC SA Pro-Pharma is not responsible for possible negative consequences arising from the independent use of information from this section. Using the information from this section, you do it yourself, understanding that: self-medication can be harmful to your health, you must read the instructions and consult a doctor before using medicines.